Saturday, April 25, 2015

Using Netbeans on Fatdog64 Linux Box for Android APP Development

Why NetBeans
There are many open source tools available to achieve Android APP programming. The options include Android Studio, NetBeans and Eclipse, or even Microsoft Visual Studio in the Windows world.
For a beginner like me, I prefer to use NetBeans since it's free and is capable of generating compact Android APPs that take very little cell phone ROM space. See the 

 (1) Install Android SDK Packages
  • (a) Find the SDK development tool kit at http://developer.android.com/sdk/index.html#Other, and choose the sdk package, say android-sdk_r24.4.1-linux.tgz (approximately 326M bytes). Move the downloaded file to an appropriate folder and use the command tar xvzf android-sdk_r24.4.1-linux.tgz to unzip it.
  • (b) Start a terminal, locate in the unzipped files for the the executable named android in the tools folder, and run android command in terminal to install essential packages, including supporting packages for different versions of Android operating system, tools, Google APIs, SDK build tools, emulator images for different versions and sample codes. This step is essential for preparing Android developing environment, and must be done before NetBeans can identify if an SDK folder is valid or not. It can be later modified after the installation and configuration of NetBeans [see step (2)(c)] using menu Tools|Android SDK Manager and AVD manager.
  • (c) Configure path variables for PATH to include sdk tools and platform-tools folder, ANDROID_HOME to point to the sdk folder, and ANDROID_SDK_ROOT in /etc/profile file.  PATH="/root/Android/Sdk/tools:/root/Android/Sdk/platform-tools:..."
 (2) Install NetBeans IDE assuming proper version of Java is installed
  • (a) Install the proper Java SDK if it not yet done. See the other blog page for instructions, and make sure PATH and JAVA_HOME are configured.
  • Go to https://netbeans.org/downloads/ and locate the right NetBeans IDE package. For example, the current version is netbeans-8.1-javase-linux.sh, and the size is 94 MB if only NetBeans Platform SDK, and only Java SE and FX are needed.
  • (b) move the NetBeans executable to appropriate location and run it in terminal to install NetBeans. The installation will take about 400 MB of disk space.
  • (c) If you prefer, use file manager (ROX Filer) and browse to /usr/share/applications to find the netbeans application icon and drag it to desktop to create a shortcut link on desktop.

 (3) Install Android plug-ins for NetBeans

  • (a) Run the NetBean IDE, Select menu Tools|Plugins|Settings (select the Setting tab) and add a new update center with the Add button: http://nbandroid.org/updates/updates.xml for NetBeans 7.3 to 8.0, http://nbandroid.org/release81/updates/updates.xml for NetBeans 8.1+. The old link http://kenai.com/projects/nbandroid/downloads/download/updatecenter/updates.xml can also be added. 
  • (b) Click the Available Plugins tab, and there should have Android (Android Gradle Support may also be available). Check them and install the Adnroid. Restart NetBeans to activate the plugins.
  • (c) Select Tools|Options|Miscellaneous|Android menu and tab combination, and browse for the installed SDK folder. In my case, it is /aufs/devsave/Downloads/android-sdk-linux. The Apply button will be enabled if the folder is correctly located. Apply to proceed. 
  • (d) Load the 32bit-slacko6.sfs and then run NetBeans, then run Tools|Android SDK Manager to create simulation devices if intended SDK system, simulation image devices, and API packages are not yet available. 
  • (e) Run NetBeans|Tools|AVD Manager and create new Android Virtual Devices for running emulation. 

(4) Trouble shooting

Often times, the installation might not work as expected when you try to create your first Android APP. This is normal since there are many ways the development system can go wrong. The following are typical problems that I have encountered:
  • R.java not found issue: try to load the 32bit-slacko6.sfs, use Run|Clean and Build project menu to let NetBeans regenerate R.java.
  • NetBeans cannot compile program: (1) 32bit-slack6.sfs needs to be loaded before starting NetBeans, (2) need to download proper versions of SDK Platform, Google APIs as well as proper virtual simulation system images through Tools|Android SDK Manager menu.
  • NetBeans cannot start Android emulator for debugging: (1) Run Tools|AVD Manager to create desired Android Virtual Devices. Notice that there are many options that may require different software and hardware resources, such as android version, screen size, CPU type, skin, camera, SD card, acceleration and so on. Try different combinations to find out one that can successfully launch. For example, the "kvm is not installed" issue can be avoided by picking different CPU type (i.e. ARM CPU) and other options.
  • No such file or director for adb or emulator even though these files are installed: 32bit-slacko6.sfs has to be loaded before these executable files can be launched.
  • If APPs crash, try to find more information through the LogCat located in monitor.
  • INSTALL_FAILED_SHARED_USER_INCOMPATIBLE: APP package not uninstalled cleanly. Run adb shell, su, pm list package, pm uninstall <package>. Also adb shell chmod 666 /data/system/packages.xmladb pull /data/system/packages.xml, remove the problematic bock in the packages.xml, then adb push packages.xml /data/systemadb shell rm /data/dalvik-cache/*adb reboot.

(5) Configurations for debugging

Once the above steps are finished successfully, NetBeans is ready for programming and debugging basic Android APP functionalities through the integrated emulators created with proper configurations. However, some debug processes such as GPS and SMS need separate tools to emulate. These involve two tools that come with the Android SDK package, available in the installed Android/Sdk/tools folder. These tools somehow don't show up as the NetBeans plugins.

  • (a) DDMS (Dalvik Debug Monitor Service) can be found in the monitor as a tab in step (b).
  • (b) Android Debug Monitor and EmulatorThese tools need to be configured in a few steps to run with NetBeans.
  • Start the emulator separately (without NetBeans) through shell command "emulator -avd ????" & where ???? can be found as $HOME\.android\avd\????.avd.
  • Start the monitor separately (with emulator running) through shell command "monitor &". The monitor will detect the emulator (i.e. emulator-5554). Use File|Static Port Configuration, then click New or Edit button to configure emulation port for the monitor to be visible to NetBeans. Enter the port number to 8700 so that it will be able to talk to NetBeans. 
  • Quit the monitor and start it again to make sure the settings take effect. If the monitor find the emulator, select the simulated device, and some simple tests can be done to verify the connection, such as sending a text message to the emulator or setting GPS location coordinates, or changing voice/data dropdown lists.
  • .
  • Start NetBeans. It appears to me that the monitor will talk to the emulated device. Right click the APP project icon, and select the target device that the emulator is based on. Start a debug process for the APP. It's possible that NetBeans won't be able to find the emulator and pop up a new emulator. Just kill the new emulator and try a few times. The APP will be installed on the emulator.
  • On the emulator, go through the setting menu, and turn on the debug option for the APP.
  • In NetBeans, run the Debug|Debug Project menu again, the emulator will show a dialog saying waiting for debugger, waiting for the debugger to attach, like this:
  • In NetBeans, use menu Debug|Attach Debug, then connect to the debugger using the option like this:
  • Click ok and the debugger be connected to the emulator, and at the same time, the emulator can also be controlled by the monitor.
  • In order to simulate GPS, the APP must have <uses-permission android:name="android.permission.ACCESS_FINE_LOCATION" /> in manifest file. Be very careful about the spelling because there will be no warning when it's compiled, leading to no GPS service providers using LocationManager.getProviders. Please also run LocationManager.requestLocationUpdates with listeners in order to get non-null locations when calling LocationManager.getLastKnownLocation(provider), otherwise getLastKnownLocation will always return null for the provider. 
  • It appears that NetBeans and the monitor can be connected to the same emulator at the same time only at some specific order. One working process seems to be like this: run emulator from command shell, then run monitor from command shell, then run the debug target APP in the emulator, it will wait for debugger if the APP has setup correctly for debugging, then in NetBeans try to attach debugger using the screenshot as follows to identify the simulated device and the APP to debug, then NetBeans will enter debug mode for the APP:
  • Some useful links about settings for GPS emulation: http://stackoverflow.com/questions/13691943/this-app-wont-run-unless-you-update-google-play-services-via-bazaar/13869332#13869332 and http://stackoverflow.com/questions/18459338/how-to-run-google-map-api-v2-on-android-emulator
  •  
(6) Debugging GeoCode
  • Since I am still some puzzled by the way emulator works, the following statements are experimental. A good reference article (Under the hood of Android Emulator) for understanding the emulation can be found at https://wiki.diebin.at/Under_the_hood_of_Android_Emulator_(appcert), in addition, creating AVD with Google APIs x.x.x (Google Inc.) seems to have google map installed by default, while Android x.x.x doesn't.
  • Some programmer pointed out that in order to show Google Map on simulator, GPU acceleration must be turned on.
  • Install necessary packages in SDK Manager in the Extras in addition to the Google APIs, SDK platform, and simulation image for targeted Android versions. The extra packages may look as follows.
  •  
  • The APP needs to refer to the google-play-services.jar library. A complete set of google-play-services.jar files are located in folder android_sdk_folder/extras/google/m2repository/com/google/android/gms/play-services/??.??.??, just rename the *.aar fils to *.zip and unzip them. Right click the APP project, select properties, click JAR Libraries, then browse to the jar library located in the extras/google/google_place_services/libproject/google-play-services_lib/libs folder, as follows. Some people recommend copying the jar file to local folder corresponding to the lib directory for the APP project. This will integrate the jar library into the compiled APP. Some programmers suggest using android update lib-project -p . --target android-17 command at .../extras/google/google_play_services/libproject/google-play-services_lib directory and then use Project|Rightclick|Properties|Libraries|Add to refer to the library folder. Also do the same for .../extras/android/support/v7/appcompat.
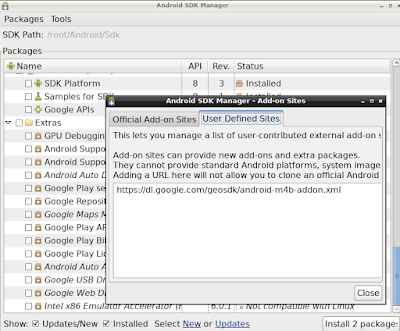
  • Use SDK Manager through Tools|Manage add-on sites menu and add https://dl.google.com/geosdk/android-m4b-addon.xml as user defined sites.
  • Install packages including com.android.vending.apk, com.google.android.gms.apk and com.google.android.apps.maps.apk. Then the Google Maps Mobile SDK for Work will show up in available packages Extras of Package by first downloading these files from http://stackoverflow.com/questions/14040185/running-google-maps-v2-on-the-android-emulator, or better search for the right version from https://androidfilehost.com or apk4fun.com, and copy them to Android SDK's platform-tools folder. Start the emulated device, then in terminal, run adb remount to make system writable, adb install com.android.vending.apk, adb install com.google.android.gms.apk and adb install com.google.android.apps.maps.apk, wait for success messages. It's possible that the emulator may have existing packages, use adb install -r ...apk. Use adb to find options of adb command. Use adb shell, and then su command, then pm list packages to find installed packages, pm uninstall a_package to uninstall.
  • Install packages including GoogleServicesFramework.apk, GoogleLoginService.apk and Phonesky.apk. Download these APPs like the way for the vending, gms and maps. These are system APPs that needs to be granted access and pushed with the following terminal shell commands: (0) from terminal, increase emulator ROM space by running shell command emulator -avd your-avd-device -partition-size 512 -no-boot-anim and then adb shell mount -o remount -t yaffs2 /dev/block/mtdblock0 /system (1) adb remount (2) adb shell chmod 777 /system/app/ (3)adb push GoogleServicesFramework.apk /system/app/, adb push GoogleLoginService.apk /system/app/, adb push Phonesky.apk /system/app/. With this and the previous step, just click Google Play in the emulator, set up gmail account carefully. Make this system change persistent by using mkfs.yaffs2 tool to create a system image (adb push mkfs.yaffs2, adb shell mkfs.yaffs2 /system /sdcard/system-new.img) and pull the created system image (adb pull /sdcard/system-new.img) and save it as ../avd/avdname.avd/system-qemu.img. But this mkfs.yaffs2 method doesn't work for me and the created system image file is smaller than the default system.img.
  • The simplest method to make changes to /system persistent is to copy the temporary image file in the form of /tmp/android-????/emulator-???? file to the ~/.android/avd/....avd/system.img (of course save the original image file). (a) run emulator -avd your-avd-device -partition-size 512 -no-boost-anim (of course load 32-bit sfs first), /tmp/android-root/emulator-?????? will show up (b) adb shell mount to check what is mounted as /system in simulated device, it is /dev/block/mtdblock0 for /system yaffs2 ro for example (c) adb remount /dev/block/mtdblock0 /system yaffs2 rw 0 0 to make /system writable (d) push necessary files to /system subfolders, the emulator-?????? file will grow in size (d) copy the emulator-?????? file before closing emulator. (e) copy the emulator-?????? to ~/.android/avd/avdname.avd/system-qemu.img. Next time the emulator is started, the change in /system will be saved, and no /tmp/android-root/emulator-?????? will be available. I guess that the easiest way of making persistent change to system is to copy original system.img that came with android SDK as ~/.android/avd/avdname.avd/system-qemu.img, then everything done to the /system will be saved in system-qemu.img, and will be used for next invocation of emulator. 
  • DO NOT copy maps.jar from Sdk/add-ons/addon-google_apis-google??/libs to the library folder of APP project folder to avoid issues such as "class resolved by unexpected dex has used a different com/google/android/maps/MapActivity". Instead right click project|JAR Libraries|Browse to ...add-ons/addon-google_apis-google-??/libs, this will allow com.google.android.maps.MapActivity been imported. The first import statement should be import com.google.android.maps.*;
  • Download and push com.google.android.maps.jar to /system/framework, com.google.android.maps.xml to /system/etc/permissions. This will resolve the strange issue where compiled APP with <uses-library android:name="com.google.android.maps"/> between <application  /application> cannot be pushed to emulator. 
  • Go to https://developers.google.com/maps/documentation/android-api/signup and click the GET A KEY button for standard Google Maps Android API. There is an option to create key for individual packages, but it's only an option. The following shows how to create key for debug (a) find the SHA-1 fingerprint of the APP package by running keytool -list -v -keystore ~/.android/debug.keystore -alias androiddebugkey, use android as password, then a 20-byte hexadecimal fingerprint numbers will show up after SHA1. (2) click link to go to Google Developers Console: https://console.developers.google.com/flows/enableapi?apiid=maps_android_backend&keyType=CLIENT_SIDE_ANDROID&reusekey=true, create a new project, then add package name and fingerprint. (3) Copy the generated key, and add a child element for <application> element in AndroidManifest.xml in the form of <meta-data android:name="com.google.android.geo.API_KEY" android:value="????...????".  
  • Need to copy sdk extra google-play-service_lib folder to the lib directory of the APP project, add rightclick|properties|libraries and point to this copied folder.
  • Must run adndroi update lib-project --path the_copied_google-play-service_lib.
  • Copy the .jar in the google-play-service_lib folder to the APP's lib folder
  • Copy the androi-support-v4.jar in extras android-support-v4 folder.
  • https://www.youtube.com/playlist?list=PLxE2viIA-WCy9hrXIRlgKYHEFX7CW9F_P
https://blog-emildesign.rhcloud.com/?p=527 says that downloading and installing HAXM http://software.intel.com/en-us/articles/installation-instructions-for-intel-hardware-accelerated-execution-manager-microsoft can accelerate emulator speed, and someone told me that turning on GPU emulator can make Google Map showing on emulator.
(7) Accessing web pages with URL
  • For accessing web pages with URL, sometimes it is necessary to put in the following codes
    • connection= new URL().openConnection();
    • connection.setRequestProperty("User-Agent","Mozilla/5.0 ( compatible ) ");
    • connection.setRequestProperty("Accept","*/*");

Installing Java SDK on Fatdog64 linux box

Download the JDK package from Oracle.com
Go to oracle.com, follow the download link, select Java Downloads, then click Java SE. The latest version of JDK download should clearly visible. Follow the link and look for the tar.gz package for Linux64 system, for example jdk-8u73-linux-x64.tar.gz, about 173 MB, and save the tarball file to an appropriate folder where the JDK files are to be installed.
Unpack the files with tar -zxvf jdk-8u45-linux-x64.tar.gz command.

Setting PATH and JAVA_HOME environment variables
 In order to allow executing java commands from any directory and let other programs that uses Java SDK, PATH and JAVA_HOME variables must be set up.
Fatdog64 uses /etc/profile for environmental variables.
Edit the profile to include the Java paths in PATH variable, define and export JAVA_HOME.

Run command 'which java', 'which javac', 'java -version' and 'javac -version' to verify that java has been installed and referred to properly. 

Follow instructions from oracle.com or google documents on line to resolve various issues. 

Friday, April 24, 2015

How to install Fatdog64 or other Puppy 64-bit versions (x86-64 computers)

Fatdog64 and other Puppy 64-bit version is a very small yet very fast 64-bit linux operating system.

There many reasons that I wanted to install Fatdog64 on my old Lenovo T61 notebook computer:
(0) It's free.
(1) It's a modern operating system full of online software tools to perform various software tasks, including programming Android APPs (see another blog for programming Android APPs using NetBeans in Fatdog64).
(2) It has very small footprint. It takes only a few gigabytes of disk space to start with (operating system on a USB is very convenient and make duplication, backup and modification easier).
(3) Individual instance of the operating system can be saved to a "savefile", and can be archived and used to roll back in case of unrecoverable damages, such as bad configuration, unintended change by user or virus, occurred to the operating system. This is especially convenient and powerful for experimenting software installation or configuration with potential system damage. The size of the savefiles can be increased if needed, therefore, it is possible to incrementally archive multiple instances of the Fatdog64 sessions with each session configured with different settings. When booting up Fatdog64, one of the savefiles can be conveniently picked.
(4) From my experience, the Fatdog64 is faster compared to it's Windows counterpart, and is much smaller compared to typical full-blown linux flavors.
(5) Thanks to the compact size of the whole operating system starting from a few Gigabytes (i.e. 4 GB), it can be installed on a USB drive, which can be carried around without affecting your current operating system. You can have your personal preferences and data (such as web browsing history, downloaded files) and installed software stored on the USB drive. 
(6) It can be installed on the same computer where other operating system coexists.


Steps to install Fatdog64:
(1) Download latest Fatdog64 iso file from http://distro.ibiblio.org/fatdog/iso/. You can see that the iso files are less than 300 MB, which means that the iso files can be burned onto a CDROM. Other linux distros are significantly larger so as to require a DVDROM.

(2) Burn the downloaded iso files (i.e. Fatdog64-700.iso) to a CDROM.
Notice that you must burn the content in the iso file to the CDROM, not the iso file itself, in order to make the CDROM bootable (LiveCD).
(3) Boot up the target computer off the newly burnt CDROM. The computer will run the Fatdog64 system off the LiveCD.
(4) After Fatdog64 has started, start Control Panel through system menu Menu|Setup|Control Panel. Select Utilities tab and run Fatdog64 Installer.
(5) Depending on the existing computer operating system and hardware resources, decisions should be made to select installation on either a USB drive, or a hard drive partition.If there are existing operating systems, decision has to be made to choose which disk drive and/or partition Fatdog64 is to be installed, and whether the allocated disk space is to be reformatted. See http://distro.ibiblio.org/fatdog/web/faqs/harddrive.html and linux forums for details. Patiently read all the instructions during the installation process.

The following photo shows my Windows 7 laptop computer after booting off Fatdog64 700. In my case, I opted to install the system on an hard drive partition which already had a Windows 7 system on sda2 (sr0 is the LiveCD).
It is important that target drive (sda2 in this case) must be unmonted in order for Fatdog4 to be installed (sda1 is mounted with a green checkbox in the top left corner of the disk icon).

After installation partition is selected, the installer will prompted for boot loader as follows.I opted to use current OS boot loader (not what's shown in photo).
Depending on the selection of boot loader, further steps needs to be taken to complete the boot loader. For example, the following photo shows that if the original Windows 7 boot loader is selected, a batch file needs to be executed in Windows 7 with administrative right to complete the boot loader configuration for Fatdog64 installation.
Check http://turboloops.blogspot.com/2013/07/installing-fatdog64-for-dual-boot-from.html for another user's experience on installing Fatdog64 on Windows computer for dual boot.

Steps to Upgrade/Update Fatdog64 kernel:
Newer version of Fatdog64 might be released, and it's a good idea to try the newer version to see if some problems can be resolved in the new version. According to http://distro.ibiblio.org/fatdog/web/faqs/kernel.html, following method is recommended to download the latest kernel files (vmlinuz and kernel-modules.sfs) from http://distro.ibiblio.org/fatdog/, and replace the current kernel files (the vmlinuz file, and the kernel-modules.sfs in initrd file). Backup your system files (fd64save.????, initrd, vmlinuz) before trying this.
  (1) Download the files from the aforementioned link: kernel-modules.sfs-?.?.? and vmlinuz-?.?.? 
  (2) Click the initrd file in ROX file explorer (located at /aufs/devsave), a window will pop up showing the kernel-modules.sfs along with a warning message.
  (3) Replace (by drag-and-drop, rename, and overwrite) the kernel-modules.sfs with the downloaded kernel-modules.sfs-???, of course taking out the -??? affix.
  (4) Click the repack-initrd  icon to rebuild the initrd file, a messagebox will pop up to indicate the completion.
  (5) Replace the vmlinuz file with the downloaded vmlinuz-?.?.? (drag-and-drop to the folder, rename and overwrite).

Saving Fatdog64 session
When shutting down Fatdog64 system after installation, the user will be prompted to create a savefile. Just follow the instructions carefully and allocate enough disk space for future use.The savefiles are regular files that carry software status of the Fatdog64 linux system. They can be archived as you like to either recover from unrecoverable damage or dedicate for different software installations. Multiple savefiles can be stored on the same computer into which Fatdog64 can boot to satisfy different purposes.

The first time savefile is used for reboot is quite slow, but it will be faster the next time.

Increasing free disk space
Fatdog64 is meant to be small in size, but it is capable of scaling up. By increasing the savefile size, users can allocate more free disk space when needed.Following the steps below to resize the savefile.
(1) Make the savefile accessable for resizing.
A typical Fatdog64 will uses a savefile by default (for example fd64save.ext4). It cannot be resized if it's in use. So the first step is to avoid the use of the savefile to be resized. One way to do this is change the reboot parameter to skip save file. This is done by modifying the menu.lst file on the partition where Fatdog64 is installed.
Typically, the menu.lst file is located at /mnt/home, in my case, the menu.lst file is stored on /mnt/sda2 (the file to the left of highlighted item). Open the file with any text editor and add parameter "savefile=none" to the end of line starting with kernel /vmlinuz. This will make Fatdog64 skip any savefile during reboot. Using a LiveCD may also achieve the same job.
(2) After Fatdog64 reboots (it may appear different since it no longer update the savefile), bring up Fatdog64 Control Panel and navigate to System tab, start the Fatdog64 Savefile Tool and increase the savefile size.
(3) Restore content of the menu.lst file so that Fatdog64 can use the increased savefile for the next reboot.


Adding desktop programs (Desktop shortcut icons)
(1) Use file explorer to browse to /usr/share/applications.
(2) Drag programs available there to desktop.
(3) Right click the icon of the newly created item, then choose Edit Item to change the name of the program.

Setting up network wired and WiFi network
There are two applications that can be utilized in the setup of network connection: wpa_gui and Network Wizard. In order to setup network connections, both programs might need to be used.One program may or may not work, and in case none of them work, or if Wifi isn't connected after boot up, try Restart Connection through the Network Wizard pop-up menu.
The easier setup is for wired (Ethernet) network connection. Simply run the Network Wizard from system menu or through Control Panel|Network tab, or right-click the circular icon (wpa_gui) on the left side of speaker icon, located in the bottom right corner, and select Network Wizard, then activate settings, then select eth0.


It is a little trickier to setup the WiFi connection. It may require the activation of WiFi (wlan0) using the Network Wizard before and/or after all settings are configure properly. 


To configure the password for secured wifi, start the wpa_gui program by left clicking it's icon, then click the Scan button if adapter is available to scan for available WiFi hotspots. The Adapter must show up before the scanning can proceed, otherwise try the Network Wizard to activate the WiFi (wlan0) again or select Restart Connection pop-up menu.
Double click on the items in the Scan results dialog to select authentication method and password, and add the item for use. Use the wpa_gui again to select the saved item from the dropdown Network list and click connect button. The item may need to be activated using the Network Wizard before it can be used.

To identify the active IP address of the Fatdog64 box, simply click the wpa_gui icon in the system tray, or in a terminal, type in "ip address show" to get technical details of the network connection.

Taking Screenshot
To take a screenshot of Fatdog64, use Shift_PrtintScreen keys to capture the whole desktop screen, or press PrintScreen key then click and drag left mouse to select areas to be captured (press PrintScreen key again to stop screen capturing). The captured screenshots are saved in /root/ folder with file names starting from xscreenshot00000.png.

Configuring vi editor

The vi editor can be configure through ~/.Xdefaults, change the color and other properties through urxvt.foreground, urxvt.geometry URxvt.font:xft:Monospace:pixelsize=15
URxvt.boldfont:xft:Monospace-Bold:pixelsize=15
and so on.

Setting Path variables
The path variables are set in /etc/profile file.

Language support for Fatdog64
The fresh installation of Fatdog64 might now have adequate support for languages other than English. For example, Chinese fonts don't come with the default installation. Search and download the necessary package and use the Fatdog64 Set Locale in Fatdog64 Control Panel to select preferred language.If the language setting messed up, use it to restore back to English. The following link provides the simplified Chinese font that works.
https://drive.google.com/file/d/0B8dQjd9vYPV3YW9WZjBiYnhOZE0/view?usp=sharing
A recent method for installing language pet is that download the language pet (for example, from https://code.google.com/archive/p/lrxianed/downloads"), and then in terminal windows, change to the folder where the pet file is downloaded and run command petget ./......pet.
Also see https://code.google.com/archive/p/cnpuppy/downloads
http://45.33.15.200/puppy/viewtopic.php?p=856267&sid=150dc467867d115a800602dd775ec429
http://www.minilinux.net/node/2496

Installing the famous iCake half Chinese packages will either stop google chromium browser from networking (by installing fictx) or crash chromium browser (by installing scim) downloading/uploading due to corrupted open dialog function. A user successfully installed pinyin Chinese input without downloading half Chinese input methods in another flavor of linux as described at https://forums.linuxmint.com/viewtopic.php?t=264802. The fossapuppy can use fcitx64_4.2.9-en-zh-bionic-18.0.51 and already input chinese by default. To stop it, just right click the chinese input menu and exit. Chromium installation cannot use the transient versions because they will not launch. If not configured correctly, when using chromium to log in to gmail.com, gmail will temporarily show for a few seconds and then automatic log out so that reading gmail is impossible. To stop this, set the chromium to log in google without having to log in chromium first: go to Settings|Privacy and security and search for Sync and Google services, turn off "Allow Chrome sign-in". Of course cookies must be enabled and history of previous gmail.com might need to be deleted.

After installing fictx, the Chrome browser will lose network connection (other browsers such as pale moon will be ok). Then just remove the fictx package from Puppy Package Manager by clicking the Uninstall button.

Installing Printer --- Failed Project.
Some manufacturers provide linux printer drivers in 64-bit deb or rpm packages. For example, the Canon LBP6030w pinter is supported by two deb packages. To install deb package, first run Gslapt package manager in Fatdog64 Control Panel and System tab, search for candi, and right click the candi package to install. Download the Linux driver packages for the pinter, and unzip it. Move to the directory where the 64-bit deb packages are located, and run candi ***.deb to install drivers.
To find out errors, check /var/log/cups/error_log.
This is a failed project. I have installed all the necessary files, but always got write 9 error code from /usr/lib64/cups/filter/pstoncapcpca. Don't know why.

Compressing videos for Android devices
Videos taken with camera or other recording devices may have files too large to be shared with email or other social media tools. Luckly, ffmpeg in linux can easily achieve high compression. However, the compressed file may not be playable on Android phones.
The following commands have proven to be able to compress MOV files to mp4 files that are playable on Android phones:
  (1) ffmpeg -i 100_100.MOV -ar 44100 -ab 96 -f flv vidoe.flv
  (2) ffmpeg -i vidoe.flv -c:v libx264 -crf 23 output.mp4
  (3) ffmpeg -i output.mp4 -vf scale=320:240 outputs.mp4
  (4) ffmpeg -i outputs.mp4 -i thumbnail.png -acodec copy -vcodec copy -map 0 -map 1:0 final.mp4
  (5) ffmpeg -movflags faststart

Other useful commands for ffmpeg tool:
  (a) Output a single frame from the video into an image file:
      ffmpeg -i input.flv -ss 00:00:15 -vframes 1 output.png
  (b) Output a frame every one second from the video
         ffmpeg -i input.flv -vf fps=1 out%d.png
        or every one minute
        ffmpeg -i input.flv -vf fps=1/60 out%03d.jpg
  (c) Extract partial video
        ffmpeg -i video.mp4 -ss 00:00:00 -to 00:02:00 -c copy cut.mp4
        ffmpeg -i input.wmv -ss 60 -t 60 -acodec copy -vcodec copy output.wmv
        ffmpeg -ss 00:00:00 -i outputs.mp4  -to 00:00:28 -c copy cut.mp4 (working)
  (d) Add image overlay
        ffmpeg -i input.mp4 -i image.png -filter_complex "[0:v][1:v] overlay=25:25:enable='between(t,0,20)'" -pix_fmt yuv420p -c:a copy output.mp4
  (e) Mute a segment of audio
         ffmpeg -i in.mp4 -af "volume=enable='between(t,105,118)':volume=0" -vcodec copy out.mp4
  (f) Merge videos side by side
        ffmpeg -i left.avi -i right.avi -filter_complex hstack -c:v ffv1 output.avi
  Regarding thumbnail preview: ffprobe, moov atom and  -pix_fmt yuv420p tag

Writing title to mp3/mp4 files
 for i in *.mp3; do ffmpeg -i "$i" -metadata title="to $i" new_"$i"; done;

Installing Citrix Receiver
From version 13.2 on, Citrix Receiver no longer requires the loading of 32-bit compatibility library (32bit-slacko6.sfs). The following describes the method for version 13.2. For previous versions, make sure that 32bit-slack6.sfs is loaded before running the Citrix Receiver, otherwise the receiver won't run. Installing newer version of Citrux Receiver will have options to override previously installed version.
   (a) Go to Citrix.com and search for the download of Citrix receiver for 64 bit linux, and download the tarball file to an appropriate folder.
   (b) Start a terminal window, go to the folder with the downloaded tarball and extract the files using command:
 tar -xvzf linuxx64-13.2.0.322243.tar.gz.
   (c) In the terminal window, run ./setupwfc and follow the prompt:
        select 1 to install the Citrix Receiver, then select installation and other options. I simply selected default and yes to all questions.
    (d) After all steps were done, select 3 to exit the installation program at the end.
    (e) Associate the Citrix launch file with the installed Citrix Receiver as follows. To run an application on a cloud server, log on to the cloud server's website, click the hosted executable program icon, a launch.ica file will be downloaded. Rightclick it in a file manager, and select 'Set Run Action' and then drag and drop the wfica.sh program onto the 'set run action' dialog.


    (f) The freshly installed Citrix Receiver doesn't have enough certificates to establish SSL connection with Citrix server, certificate files need to be copied to key store folder, in my case, it is /opt/Citrix/ICAClient/keystore/cacerts. I have made a copy of a a lot of certificates and you can download it and unzip the files to the folder. Use the following link: https://drive.google.com/file/d/0B8dQjd9vYPV3T1RReXRnU0lwQy1xR3IwZW83TThkWFVXem5z/view?usp=sharing.
    If you see this error message "You have not chosen to trust Go Daddy secure certificate authority – g2”, down load the certificate file by command wget http://certificates.godaddy.com/repository/gdig2.crt and copy to the keystore/cacerts. If you see error like "entrust root certificate authority g2" not enabled, then go to https://www.entrustdatacard.com/pages/root-certificates-download and click the download button and copy the entrust_g2_ca.cer to the folder.
    (g) Then in file manager, when the downloaded launch.ica is clicked, the Citrix Receiver will establish the connection with cloud server and start the hosted application.
    (h) The best solution for a complete set of certificates might be using the /etc/ssl/certs folder to replace the citrix cacerts folder by a link. That is, rename the cacerts to cacerts_old, then ln -s /etc/ssl/certs /opt/Citrix/ICAClient/keystore/cacerts.

  Creating images with transparent background with gimp
  (1) Load image into gimp, and display the lay and channel tool box.

  (2)  Add an Alpha layer if no present to make transparency possible via Layer|Transparency|Add Alpha Chanel menu.
  (3) Define the areas to be transparent using Tools|Selection Tools|Fuzzy Select (the so called Magic Wand tool) menu or any other methods. Then change the color of the selected area to a selected color, white for example, using Color|Colorize or other methods.
  (4) After the intended transparent areas are changed to one color, use the magic wand tool again to select these areas (hold shift key to select multiple areas), and make them transparent by using Colors|Color to Alpha menu to change the white color to transparent.
  (5) Export the transparent image by File|Export As menu.

Streaming video/audio between Android devices and Fatdog64
   The VLC Media Player is not only a media player, but also a good tool for streaming video and photos accessible to other devices, such as android cell phones or android based media player, over the local network including WiFi. This makes it possible to play media files located on a Fatdog64 box on a cell phone connected to the same network via WiFi.

There are few key steps need to be taken in order to achieve the streaming of media files via VLC Media Player.

Chrome browser crash issue
The latest chrome browser had hard crashed the whole linux system very frequently. To resolve this issue, the hardware acceleration must be turned off. Start the chrome browser, but done browse any web page, start the setting by going chrome://settings/, then click the advanced label in the bottom, then find the "Use hardware acceleration when available" option and disable it. Then restart the browser.

Installing apt and apt-get 
Install the apt from Package Manager. Then run sudo touch /var/lib/dpkg/status if apt-get complains that flAbsPath on the folder failed, then run sudo apt update && sudo apt upgrade. Or sudo apt dist-upgrade is needed if there are pending updates.

Sharing files between Fatdog64 and Windows

  The Fatdog64 has integrated samba service for sharing files between Fatdo64 linux and Windows operating systems. Simply run the Fatdog64 Control Panel,  then go to System tab, and double click the Manage Servers and Services icon as follows,
.
(For newer versions, Samba is managed through system menu such as Network|Samba Simple Management.) Then start the samba through the following GUI,
.
In Windows, start file explore, then the shared folder (~/Downloads, as indicated in /etc/samba/smb.conf) will show up as FATDOG64 in the Network of the Windows file system.


Coexisting with other Linux system: restoring boot menu after installing Ubuntu

  It is possible to install other linux along with Fatdog. However, the boot menu for Fatdog64 may disappear after installing other Linux (i.e., installing Ubuntu 16 with boot menu on the same partition with Fatdog64 will hide the boot option for Fatdog64). This can be fixed by "Grub4Dos bootloader config tool" in the Fatdog64 Control Panel|Utilities tab. 
  One note regarding video issue for installing Ubuntu on computer with NVIDIA graphic card: Ubuntu will crash/freeze with display totoally messed up, either via live CD ROM or normal installation. To resolve this issue, the following needs to be done:
 (a) After installatin, reboot to Ubuntu, before Ubuntu crashes, choose text mode (Alt_Ctrl_F12), then login (may have to try several times in order to log in properly).
 (b) Run sudo apt-get update command to update software lists. 
 (c) Run apt-get install nvidia-current to install latest NVIDIA drivers.
 (d) Run sudo reboot to reboot.